MintScript Learn
Market Structure: Which Break Actually Matters?
BOS, CHoCH, and MSS without overlabeling. Pick the protected swing, wait for a close-based break, then trade the response — not every wick.
Start with what price is protecting You don’t need twenty labels on your chart. You need to know which swing keeps the current structure intact. If every tiny break changes your bias, you’re probably mixing internal movement with the larger structure.
An uptrend has a sequence of higher highs and higher lows on the timeframe you chose. A downtrend has lower highs and lower lows. Sounds simple. The hard part is deciding which swings count before the next move happens.
Here's the rule I want you to practice: confirmed pivots with two candles on either side. A pivot high exceeds the highs of those four neighboring candles; a pivot low sits below their lows. That convention is a teaching rule, not an optimal setting. Crucially, you only know that pivot two candles later. Don’t pretend it was confirmed at the extreme.
Agree on the language first SMC terminology varies between traders. Here's the language I'll use with you. A BOS is a candle-body close beyond a selected structural swing in the existing trend direction. A CHoCH is the first close through the swing supporting the prior sequence. An MSS adds a forceful displacement move through that opposing swing. These labels describe observations; none proves that a new trend will follow.
In an uptrend, the protected low is the selected low preceding the advance that produced the latest confirmed higher high. A tiny dip inside that advance can be internal structure. Breaking it might signal a pullback while the larger uptrend remains intact.
Choose one close-based rule for the lesson. A wick beyond the swing is a warning under this convention, not a confirmed BOS. A wick-based system is possible, but it is a different rule set.
Walk through the sequence Synthetic prices: price rallies from 100 to 110, pulls back to 105, and closes above 110 on its way to 116. The close beyond 110 is bullish BOS under our rule. Once the new high is confirmed, 105 is the selected protected low.
Now price slips below a small internal pivot at 113. That doesn’t automatically turn the whole sequence bearish. If it then closes below 105, the larger bullish structure has lost its protected low. That is our CHoCH. A sharp decline through 105 with a large body relative to the previous five candles supports the MSS label. It still doesn’t tell you to short the bottom of that candle.
The trade is in the response A possible short model waits for a retest of the broken structure and a rejection close on the execution timeframe. The stop belongs beyond the swing invalidating that rejection. The target must leave room before the next support. If price never retests, this model never enters.
What changes your mind? A recovery through the broken level weakens the immediate bearish idea. A new higher high may overturn the larger reversal thesis. Define your order-level stop separately from the broader analytical thesis; don’t wait for a grand structural reversal while ignoring a smaller trade stop.
Where this goes wrong Price can break structure inside a range and reverse again. A CHoCH in the middle of a range has different context from one at a higher-timeframe extreme. The label doesn’t replace location.
Another mistake is moving the protected swing after it breaks. Keep your original chart. If it failed, record the failure. A framework that can never be wrong can’t be tested.
Make it repeatable Record the context timeframe, pivot confirmation rule, protected swing, break candle, and whether a retest occurred. Separate internal breaks from external breaks in your journal. You might find one is useful for managing positions and the other is better for framing bias. That’s a more useful result than collecting another acronym.
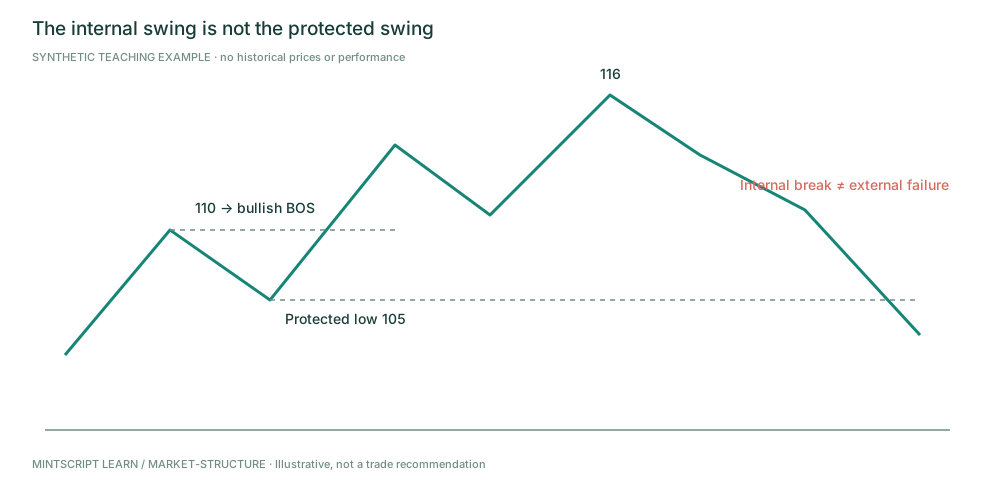
Mark the protected swing before the break. Small internal damage can precede a deeper failure.
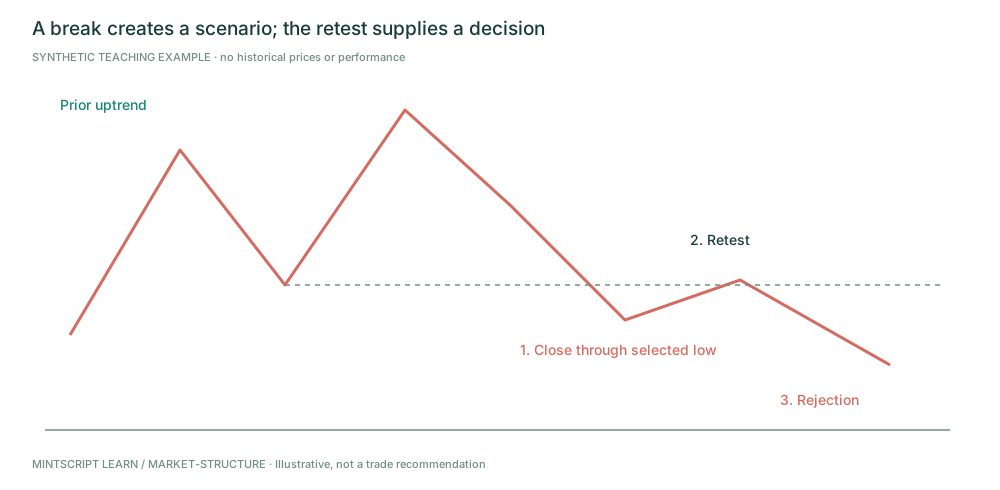
This short template requires the break and the retest trigger. Neither guarantees follow-through.
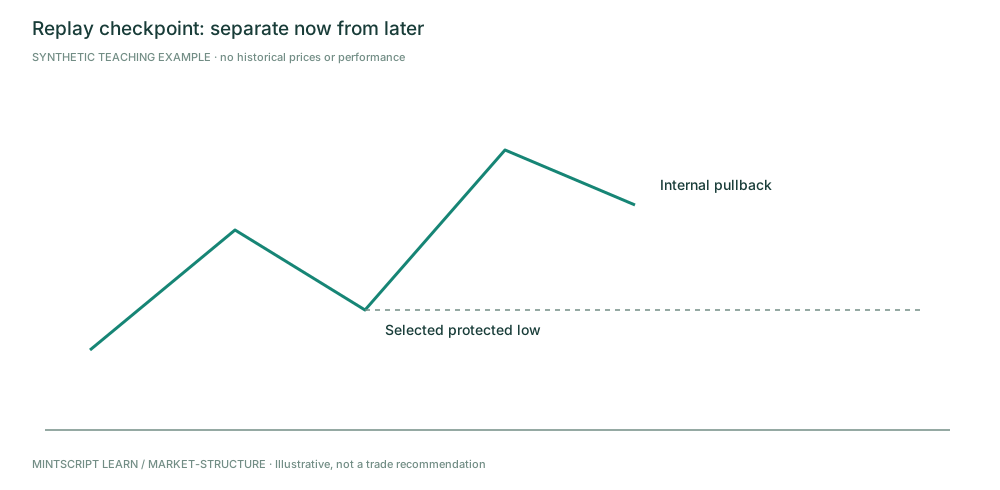
Hide the future. Describe what is known before revealing the later information.
Practice checkpoint
Price makes 100 → 110 → 105 → 116, then breaks an internal pivot at 113 while staying above 105. Has our larger bullish sequence failed?
Worked answer (peek after you decide): Not yet. The selected protected low is 105. The internal break warns of a pullback. A close below 105 would meet our larger CHoCH convention; it still would not guarantee a downtrend.
Source and editorial notes
Original MintScript Learn framework. All charts and numerical examples are synthetic teaching paths — not historical trades, backtests, or performance claims. SMC / indicator labels use the explicit conventions in this lesson; they are not standardized market facts. No win rates or “institutional order” claims are asserted.
Desk features referenced: Struct · FVG · VP · Heat · Markets · ATR stops.